Comprehensive Overview of REST APIs and How to Use Them?

Author : John Prabhu 14th Oct 2020
As a developer, you must have come across the term “REST API” whenever you want to access data from another source on the internet such as Facebook, GitHub, Twitter, etc. In reality, what is a REST API in the IT world? What are its capabilities and how to use it? Let’s dive deep into every detail and understand everything about REST API so that it becomes easy for you to read and comprehend API documentation for effective use.
What is a REST API
Let’s assume you’re trying to find videos about REST APIs on YouTube. When you type REST API on YouTube’s search field and hit enter, you see a list of videos about REST APIs. That’s how a REST API works in the IT world. When you search for something, you get a list of results from the service where you were requesting from.
API stands for Application Programming Interface. It is nothing but a set of rules that enables programs to communicate with each other. Simply put, a developer builds an API on the server and allows the client to communicate with it.
REST stands for Representational State Transfer and it determines how an API looks like. To create a REST API, you should follow certain rules. One of those rules states that you should be able to get a piece of data (called a resource) when you link to a specific URL.
Each URL is called a request while the data sent back to you is called a response.
The Anatomy of a Request
A request is made of four major things:
- The endpoint
- The method
- The headers
- The data (or body)
The endpoint (or route) is the url you request for. It follows this structure:
root-endpoint/?
The root-endpoint is the starting point of any API you’re requesting from. The root-endpoint of Twitter is api.twitter.com and the root-endpoint of GitHub is api.github.com.
The path determines the resources you’re requesting for. For instance, you can assume it as an IVR machine that asks you to press 1 for a service, 2 for another service, and so on.
You can access API paths similar to accessing links on a website. For instance, if you want to check all the posts written by me on TechAffinity blog, you can simply navigate to https://techaffinity.com/blog/author/john/. https://techaffinity.com/ is the root-endpoint and /blog/author/john/ is the path.
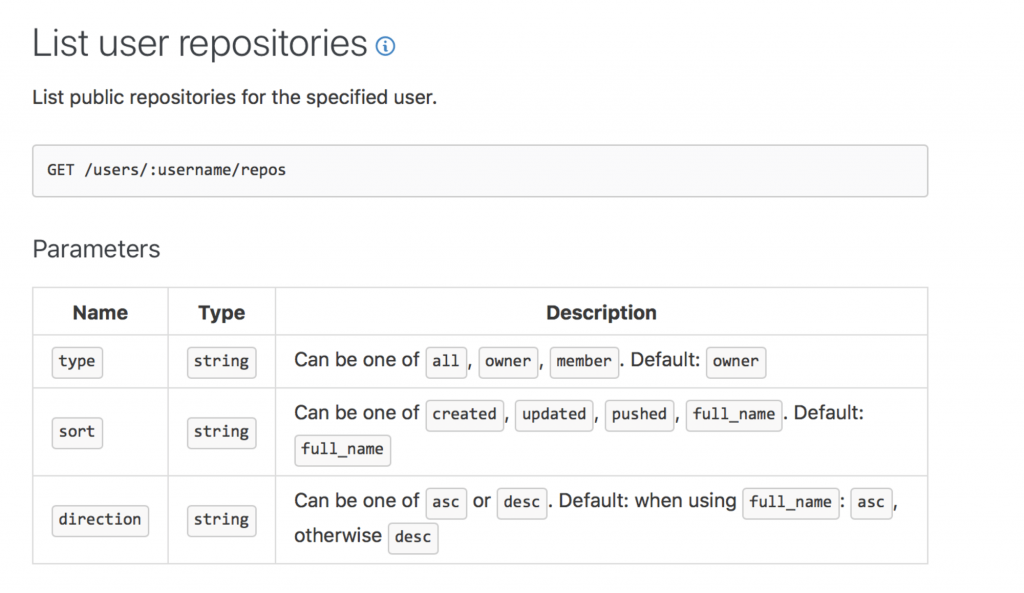
To identify the paths available to you, you have to go through the API documentation. For instance, let’s consider a situation where you want to get a list of repositories of a user through GitHub’s API. The docs help you to use the following path:
/users/:username/repos
The use of colons (:) on a path represents a variable. You should remember to replace these values with actual values whenever you’re sending a request. In the above sample path, you should replace “username with the actual username of the user you’re requesting for.
Though query parameters are not a part of REST architecture, you’ll come across a lot of APIs that use them as the final part of an endpoint. Hence, to help you understand how to read and use APIs we’ll discuss them in the coming sections. Query parameters offer an option to customize your request with key-value pairs. Query parameters always begin with a question mark and each parameter pair is separated using ampersand. Below is an example:
?query1=value1&query2=value2
With the help of three possible parameters, you can modify the results you get when you search for a user’s repository.
If you’d like to get a list of the repositories that I pushed to recently, you can set sort to push.
If you want to get a list of gists that I pushed to GitHub, you can set sort to push.
https://api.github.com/users/hanushk/gists?sort=pushed
Testing Endpoints with cURL
As a developer, you can send a request using any programming language of your choice. Here are some examples: JavaScript developers can use the Fetch API method and jQuery’s AJAX method, Ruby developers can use Net::HTTP Class, Python users can use Python Requests; and so on.
Since the API documentations are usually written with reference to cURL, we’ll be using the command line utility called cURL. When you start understanding cURL, it’ll become easy for you to understand API documentations. As a result, you can easily perform requests with your preferred programming language.
Ensure you have cURL installed on your machine and to check the version of cURL installed on your machine, simply open your Terminal and type curl -version.
curl –version
You will get a “command not found” error if you don’t have cURL installed on your machine. If this error occurs, then you have to install cURL.
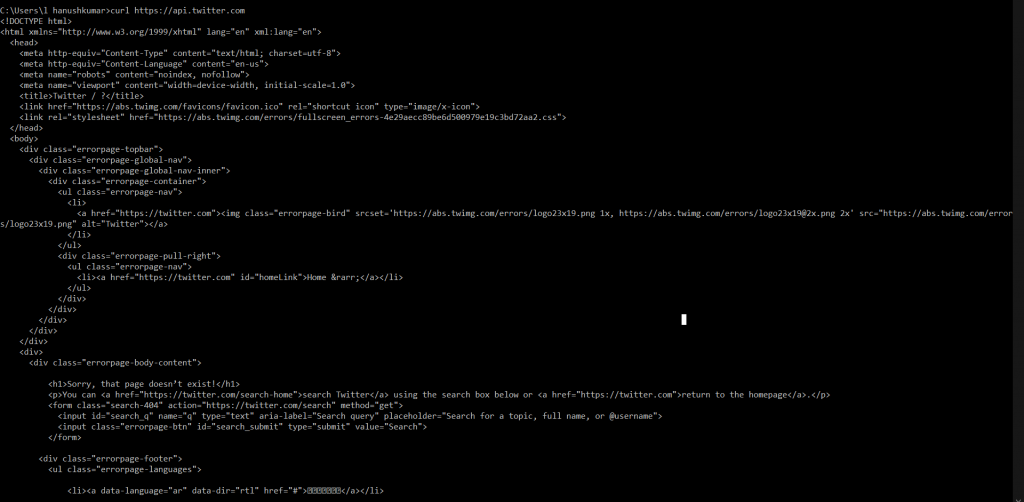
To use cURL, you can simply type curl before your endpoint you’re requesting for. For example, to get Twitter’s root endpoint, you’ve to type curl https://api.twitter.com
Once you hit enter, you should get a response from Twitter that looks like this:
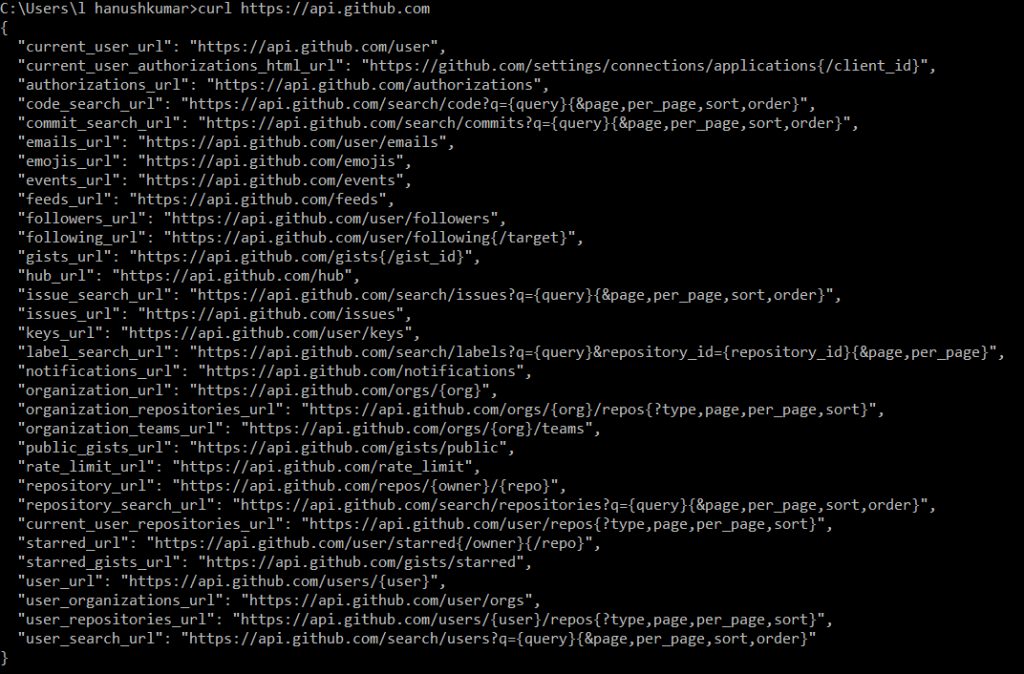
In the case of GitHub, type curl https://api.github.com and when you hit enter, you will get a response similar to the below image.
To get the list of a user’s repositories, you can specify the endpoint to the correct path as discussed above. To get a list of my GitHub gists, you can use the following command:
curl https://api.github.com/users/hanushk/gists
If you want to include query parameters with cURL, then you have to include a backslash before the ‘?’ and ‘=’ characters. Since the ? and = are special characters in the command line, you need to use backslash to interpret them as normal characters.
curl https://api.github.com/users/hanushk/gists\?sort\=pushed
JSON
JavaScript Object Notation (JSON) is a common format to send and receive data through a REST API. The response you receive from the endpoint will also be in JSON format.
A JSON object looks similar to a JavaScript Object. In JSON, every property and value must be written within double quotation marks as shown below:
{
“property1”: “value1”,
“property2”: “value2”,
“property3”: “value3”
}
Let’s Revisit the Anatomy of a Request
- The endpoint
- The method
- The headers
- The data (or body)
Now, let’s see what makes a great request.
The Method
The method is a type of request you send to the server. There are 5 types of methods and you can choose any one of them.
- GET
- POST
- PUT
- PATCH
- DELETE
These methods can be used to perform 4 possible actions namely: Create, Read, Update and Delete (CRUD)
| Method Name | Request Meaning |
| ‘GET’ | The GET request is nothing but a method used to perform ‘READ’ operation and it is also the default request method. |
| ‘POST’ | The POST request is nothing but a method used to perform ‘CREATE’ operation and is used to create a new resource on the server. |
| ‘PUT’ and ‘PATCH’ | These two requests are used to update a resource on a server. If you perform a `PUT` or `PATCH` request, the server updates an entry in the database and tells you whether the update is successful. In other words, a `PUT` or `PATCH` request performs an `UPDATE` operation. The PUT or PATCH request helps you update an entry in the database and let you know whether the update is successful or not. Simply put, it performs the ‘UPDATE’ operation. |
| ‘DELETE’ | The DELETE request deletes an entry from the server and lets you know whether the deletion is successful or not. Simply put, a ‘DELETE’ request performs a ‘DELETE’ operation. |
You can use the GET request to get a list of repositories from a user. To create a new GitHub repository, you need a POST request.
POST /user/repos
You can set a request method in the cURL by writing –request or –X followed by the request method. The below command lets you to create a repository via cURL
curl -X POST https://api.github.com/user/repos
When you run the above request on your terminal or command prompt, you will get “Requires Authentication” as an error message.
{
“message”: “Requires authentication”,
“documentation_url”: “https://developer.github.com/v3”
}
The Headers
Headers play a vital role in offering information to both the server and the client. It is used for various purposes such as authentication and providing information about the body content. Also, you can find a number of valid headers on MDN’s HTTP Headers Reference.
HTTP headers are property-value pairs and are separated by a colon. Here’s an example below for better understanding:
“Content-Type: application/json”. Missing the opening “.
Also, you can send HTTP headers with cURL through the –header or –H option. You can use the following command to send the header request to GitHub’s API:
curl -H “Content-Type: application/json” https://api.github.com
(Note: the Content-Type header is not a requirement for Github’s API to work. This is only an example to illustrate how to use a header with cURL).
You can use –v or –verbose option to view the headers you’ve sent along with your request as shown below
curl -H “Content-Type: application/json” https://api.github.com -v
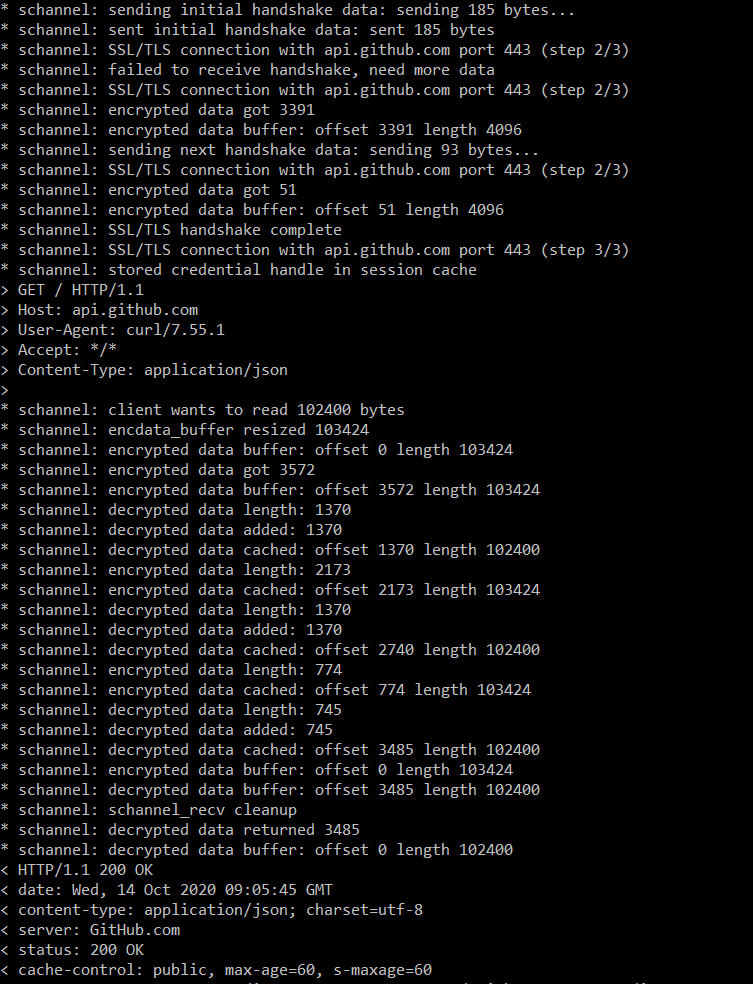
cURL gives additional information, which includes headers when you use the verbose option
Let’s see what the symbols *, <, and > mean in the above figure.
* – additional information provided by cURL
< – request headers
> – response headers
The Data (Or “Body”)
The data is nothing but the information you want to send to the server. Data is also commonly known as body or message. It can be used only with POST, PUT, PATCH or DELETE requests.
You can use –d or –data option along with cURL to send data. Here’s an example below:
curl -X POST <URL> -d property1=value1
With the help of multiple –d options, you can send multiple data fields:
curl -X POST <URL> -d property1=value1 -d property2=value2
Also, you can break the request into multiple lines with the help of backslash (\) to have better readability of code.
curl -X POST <URL> \
-d property1=value1 \
-d property2=value2
You can easily create an endpoint by visiting requestbin.com and clicking on “create a public bin”. As a result, you get an URL with which you can test requests such as https://enuhtviswipjn.x.pipedream.net/.
The request bin offers a unique URL that expires in 48 hours. Also, try creating your request bin if you want to test your requests and they will be open only till 48 hours after creation.
You can now send some data to your request bin as a test and then refresh your bin’s webpage. You’ll see some data as shown below
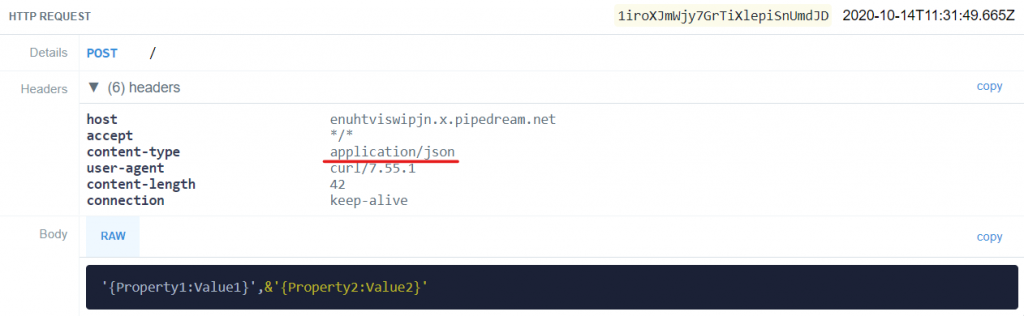
curl -X POST https://enuhtviswipjn.x.pipedream.net/ \
-d property1=value1 \
-d property2=value2
Below is an image that shows the requests you sent to the bin.

cURL always transfers data as if they’re sent through form fields on a webpage. When you are planning to send JSON data, you need to set the Content-Type to application/json, and format your data as a JSON object as shown below:
curl -X POST https://enuhtviswipjn.x.pipedream.net \
-H “Content-Type: application/json” \
-d ‘{
“property1″:”value1”,
“property2″:”value2”
}’
Authentication
Nobody would allow some unknown person to access their bank account without their permission. Similarly, developers also take necessary measures to let you perform certain action only when you’re authorized to do so. As a result, nobody can impersonate you.
The methods such as POST, PUT, PATCH, and DELETE requests change the database and to prevent it, almost all of the developers always secure them with an authentication wall. In special cases, a GET request also demands authentication.
There are two ways to authenticate you on the web:
With a username and password (a.k.a. basic authentication)
With a secret token
Using the secret token method that includes oAuth, you can authenticate yourself with social media networks such as Twitter, Facebook, GitHub, Google, etc. Here, we will be discussing only the basic authentication.
You can use the –u option to perform a basic authentication with cURL, followed by your username and password as shown below:
curl -x POST -u “username:password” https://api.github.com/user/repos
You can try authenticating yourself using your username and password through the above request. Once the authentication process becomes a success, you can see the response changing from “Requires authentication” to “Problems parsing JSON.” It is because you need to provide some data to the server that is required by all request methods.
HTTP Status Codes and Error Messages
Earlier, the messages you received such as “Requires Authentication” and “Problems parsing JSON” are error messages. You receive these messages only when there is a mistake in your request. HTTP status codes allow you to tell the status of the response instantly.
200+ means the request has succeeded.
300+ means the request is redirected to another URL
400+ means an error that originates from the client has occurred
500+ means an error that originates from the server has occurred
Also, you can debug the status of a response with the head option –I or –head, or the verbose option –v or –verbose.
For instance, let’s consider you are adding –I to a POST request without your username and password. In this case, you will get a 401 status code that is Unauthorized.

When your request is missing certain data or it is wrong, then your request will get a 400 status code that is a bad request.

API Versions
Usually APIs are updated from time to time. Sometimes, the API needs so much change that the developer upgrades the API to another version. When this happens, your application tends to break because you would have written code for the older API; whereas, your request points to the newer API. To avoid this, you request for a specific API version in two ways. They are:
1. Directly in the endpoint
2. In a request header
For instance, let’s take a look at Twitter. Twitter uses the first type and also while writing, it is evident through its endpoint that the API is at version 1.1.
https://api.twitter.com/1.1/account/settings.json
On the other hand, GitHub uses the second method. While writing GitHub’s API version is at 3. So, you can specify the version with an “Accept” header as shown below.
curl https://api.github.com -H Accept:application/vnd.github.v3+json
Wrapping Up
So, we have understood what a REST API is and how to use cURL to perform a request with various request methods such as PUT, POST, DELETE, PATCH, and GET. Also, we discussed briefly about request authentication with the –u option, and various HTTP statuses.
We, at TechAffinity, have expert developers who can assist you with your unique requirements. If you have further queries about REST APIs or generally about APIs, feel free to shoot a mail to media@techaffinity.com or schedule a meeting with our experts.